Learn how to create DIY Party Decorations using Silhouette Design Software and Silhouette Cameo for a sweet Bows or Arrows Gender Reveal – or any other – party.

My sister is having her first baby! I’m so excited for her, and I was honored when she asked me to throw her a Gender Reveal Party. I really enjoy getting creative and making party decorations. Silhouette Studio is my favorite design software. I use it all the time, even if I’m not going to use my Cameo to cut things out. For me, the design process always starts with the invitations. They set the mood and theme of the party, and I use them to design almost everything else. You can find a printable PDF fill-in version of the invitation at the bottom of this post.
Designing the Invitations
To create the invitation, I used a marbled background and placed a white rectangle on top of it to create the border. My sister and her husband picked Bows or Arrows for their theme. There are lots of cute invitation ideas on Pinterest, but I wanted to make my own. Ultimately, I liked the soft sweetness of the leafy wreath decorated with the bows and arrows. Then, it was just a matter of filling in the important party information and picking my project fonts. I call them my project fonts because I used them in everything else I created for this project. I also used the same bows and arrows elements throughout to keep it all cohesive. To create the ombre effect in some of the elements and fonts, I used a gradient fill pattern and picked the colors under the Advanced Options tab.

Once I had my sister’s final approval on the invitation, I went to work designing everything else. Actually, I should say we did. For the first time ever, my 10-year-old and 8-year-old sat with me at the computer and helped me during the design process. This made the whole project so much more special to me because I got to share something I really enjoy with them. We rotated bows and arrows until they were just right, changed colors, and picked fonts until we knew that we had created something special to bless my sister (and their aunt). As you can see, we used the same fonts, colors, and design elements over and over again in different ways. After the invitation was finalized, the rest came together quickly.
DIY Arrow Fruit Skewers with Colored Cardstock


These arrow skewers are very simple to make. In Silhouette Design Studio, I filled the page with the design above. The arrow tops are 2 inches wide, and I was able to fit 15 in one 8 1/2″ X 11″ page. To match the party theme, I used pink and blue card stock. Then, I used hot glue to stick them to the wooden skewers. I placed a line of hot glue down the center of the arrow-top and set the skewer (blunt side up) in the glue and held it for a few seconds. I like the hot glue because it sets almost instantly, and it doesn’t make the paper bubble or warp.

Originally, when I was planning this party, I wanted to put the skewers in a watermelon. But it’s not the time of year for watermelon, so I couldn’t find any. I went with the honeydew melon instead, but I wasn’t sure if it would hold all my skewers. So, I pre-poked all the skewers (with the pointy side) into the melon without any fruit on them. This actually turned out to be very helpful, and I will definitely do it again next time. Having the holes already in the melon made it so much easier to put the fruit-loaded skewers in. And, I already had my random arrangement of colors. My daughter helped me pull the skewers out, load them with fruit, and put them back in the same spots. Just as an FYI, half of a honeydew holds about 35 skewers very nicely.
DIY Cake Topper with Cardstock

I really enjoy making cake toppers. It’s pretty easy, and it’s so personal. I think it makes a cake that much more special. For the design, I wrote out the saying with my project fonts and made sure the words overlapped a little. I also added in the bows and arrows I’ve been using for all the decorations.
The question mark required a little more work, but it wasn’t too hard. I took the leafy wreath from the invitation and sliced it into small pieces using the knife tool in Silhouette Studio. Then, I rotated the pieces around one at a time until I got the question mark shape. Finally, once all the pieces were where I wanted them, I welded them together (Object -> Modify -> Weld). I also used a circle for the dot. The leafy design is very intricate, so I created an offset line around it with the offset tool.


Assembling the Cake Topper
To put the cake topper together, I first grouped the whole design together (making sure all the elements overlapped just a little). Then, I offset the design with an offset distant of 0, which basically just traced around the whole design (the image in the bottom left corner of the Silhouette Studio Screen Shot). To give the cake topper strength and stability, I cut 3 of these outlines out of white card stock. On one of the outlines, the Silhouette Cameo drew the leafy question mark using a sketch pen before cutting out the card stock shape. I cut out the rest of the shapes as indicated with glitter card stock, pink and blue card stock (the same as the arrow tops), textured grey card stock, and mirrored card stock.
To build the cake topper, I used scrapbooking glue to stick one white outline to the back of the outline with the sketched question mark. Then, I layered the rest of the colored card stock elements on top. Next, I turned the cake topper over and hot glued two wooden skewers to the back (in the least visible spot and on the sides for the most support). Finally, I used the scrapbooking glue again to glue on the last white outline piece to cover up the wooden skewers on the back side.
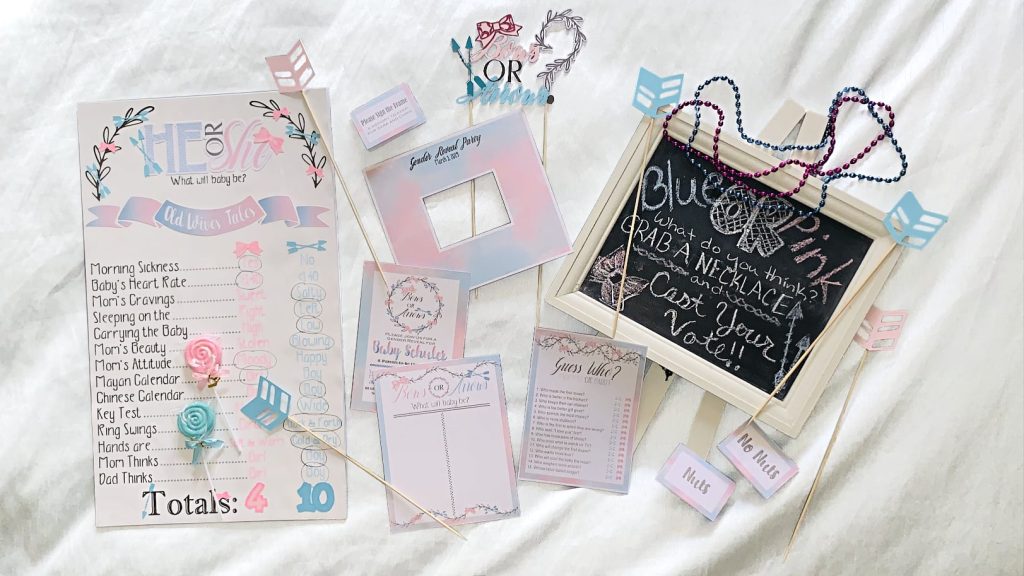
DIY Vote Page & Guess Who Game

These two pages were pretty simple to make. I used the same border and fonts from the invitation. I created the leafy decoration by slicing the wreath from the invitations into pieces with the knife tool in Silhouette Studio. Then, I rotated and flipped the pieces to create the wave pattern and finally welded them together (Object -> Modify -> Weld). You can find PDF printables of the game and vote page at the bottom of this post.


I printed multiple copies of the Guess Who? game on copy paper (2 per page) and cut them with my paper cutter. We put these out on the table for party guests to fill out, and later Mom and Dad told us the answers. The vote tally sheet is designed to be a keepsake, so I printed in on card stock. We set out pink and blue pens for party guests to cast their votes. These will go in the baby’s scrapbook or baby book as a fun memory.
Print and Cut: Tent Cards & Signature Photo Mat


Tent cards are a fun and easy way to decorate for a party. I’ve used them many times to help label food or give directions to party guests. They are super simple to make. I used the same border again and wrote in the labels with the text tool in Silhouette Studio. This part of the project is a print-and-cut. So, I printed out the cards and then the Silhouette Cameo cut them for me. The cut line (the red line) is twice as tall as the label, so you can fold the card in half and it’ll stand up. You can cut them with a paper cutter too, but the Cameo cuts them perfectly. The folded tent cards are 3″ wide by 2″ tall, so the cut rectangle is 3″ x 4″. You’ll find blank PDF printable tent cards at the bottom of this post.


To create the signature photo mat, all I needed to know was the size of the ultrasound picture. Then I created a 2″ border around it, so guests would have enough room to sign. I created the photo mat as a print-and-cut as well and used the Silhouette Cameo sketch function to write the title and date across the top of the frame. I printed the frame on white card stock and set the red cut lines with an internal and external offset to make a white border. This will also go in the baby’s scrapbook, so I didn’t design it to fit in a wooden frame. However, if you want to frame yours, you can simply adjust the overall size of your mat to fit inside your wooden frame. You can find a PDF printable of the photo mat at the bottom of this post.
DIY Old Wives Tales Poster


When my sister and I were discussing the plans for her party, we knew we had to have a poster with the Old Wives Tales. I had to ponder this one a bit, though. It had to be a poster — a big display everyone could see. I designed the poster in Silhouette Studio, but I wasn’t quite sure how I was going to build it. I knew I could cut out the bigger elements, but that wouldn’t work with the smaller fonts. And, I didn’t want to handwrite it.


Finally, it hit me. I cut a white poster board down to 12″ in width and ran it through my Silhouette Cameo. I moved the Cameo to the floor to give it enough room to move around the cutting mat. It worked amazingly well. Using the sketch function, with grey, pink, and blue pens, the Cameo wrote out all the Old Wives Tales for me in beautiful straight lines and perfect handwriting. The machine also wrote “totals” for me, and I colored it in by hand with the same pen. I also circled the correct answers by hand.
The heading and subheading were print-and-cut designs. I used textured card stock for the leafy arches and blue and pink card stock (enhanced with sketch pens) for the bows, arrows, and numbers. I glued all the card stock elements to the poster with scrapbooking glue. Once the poster was dry, I glued the whole thing to a piece of white foam-core board, so it could stand up by itself. I created a PDF printable version of the poster, which you’ll find at the bottom of this post.

Most of these fun decorations turned into keepsakes that my sister will show her baby one day — even the cake topper!
Download the PDF Printables: Bows-or-Arrows-PDF-Printables.zip
Download the SVGs: Bows-or-Arrows-SVGs.zip
Also check out the DIY Gender Reveal Keepsake Canvas Tutorial and Bows or Arrows Gender Reveal Party: Food, Decor, and More
Save and Share these Ideas!! Click Here to Pin!!