Learn how to create an easy personalized Gender Reveal Keepsake canvas with vinyl stickers, acrylic paint, and squirt guns. Make memories to last a lifetime.
There are lots of fun gender reveal ideas on Pinterest, but most of them are designed to be thrown away when you’re done. When my sister asked me to throw her a gender reveal party, I knew the reveal had to be something she could keep as a memory. After tossing around some ideas together, we decided on a canvas that could hang above the baby’s crib—a very special decoration for the nursery.
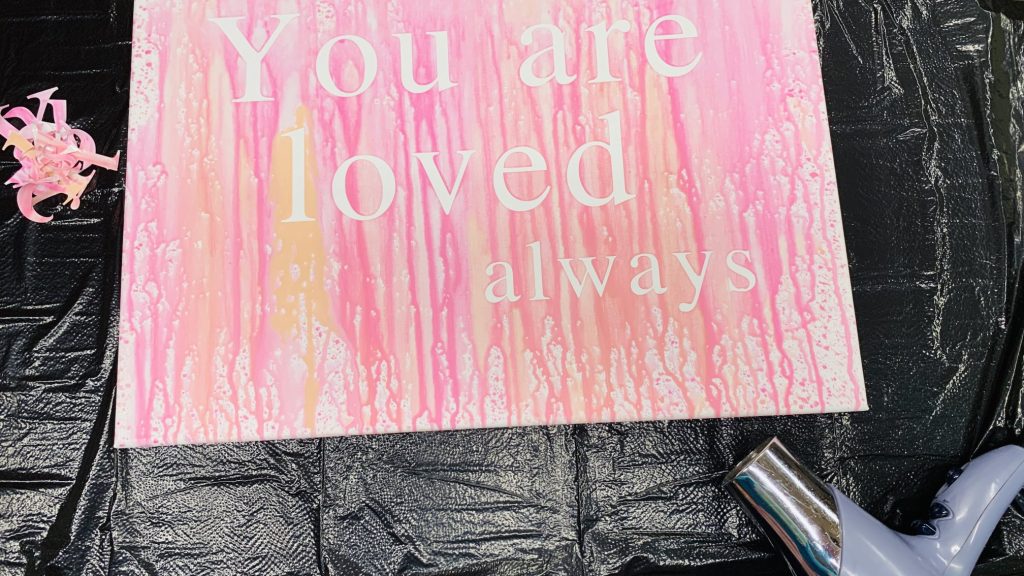
Gender reveal canvases are pretty common. We didn’t want it to say “It’s a Boy” or “It’s a Girl,” though. That’s kind of a weird decoration to hang in a nursery. So my sister picked out a special saying that would go great in a boy or girl nursery: “You Are Loved Always.” I had this idea that I wanted the words to magically appear as my sister and her family painted the canvas. But before I tell you how I made the canvas work, let me tell you how I failed.


Failing on the Way to Beautiful Art
My plan to create the magically appearing words was to use outdoor waterproofing fabric spray, just for the letters. Then, as they painted the canvas, the watered-down acrylic paint wouldn’t stick to the words. This would make the words seem to magically appear.
To make sure everything would run smoothly at the party, I created a practice canvas to test my idea. I cut out a fun saying for my girls out of vinyl, using my Silhouette Cameo. Then, I transferred the large vinyl sticker to the canvas and taped-off the edges with painters tape to make sure everything was covered (see the pic on the left). I carefully pressed down all my edges, so the only exposed canvas was the letters. Then, I sprayed it with the waterproofing spray.
Well, as the picture on the right shows, the spray went right through the vinyl like it didn’t even exist. It wasn’t that the spray bled a little under the edges. The saying wasn’t visible at all. I did try spraying it with paint, and it was very waterproof. The paint didn’t stick at all to the entire center of the canvas.
After this fail (boy am I glad I practiced first), I tried a bunch of other options. My husband suggested wax because it is impervious to water. So I tried ironing wax paper over the vinyl outlined letters. That didn’t work. I tried carefully dripping melted candle wax. That worked okay, but I couldn’t get my vinyl stencil off without pulling the wax off too. I even tried hand painting on the waterproofing spray, but the letters weren’t very clear. After a couple hours of experimenting with various ideas, I went back to a method I know works well.

How to Create Your Canvas
- First, use Silhouette Studio to lay out the saying to fit your canvas (mine is 18″ x 24″).
- Second, use a Silhouette Cameo to cut the letters out of vinyl. Weed out all the unwanted background vinyl (keeping only the letters) and transfer the saying onto vinyl transfer paper. If you don’t have a Silhouette cutting machine, you can easily use pre-cut letter-stickers from the craft store instead.

- Third, put a piece of painters tape across the canvas to help you line up the saying and keep it straight. My tape is 6″ from the top of the canvas.
- Fourth, remove the vinyl backing only from the top line of the saying. Because the canvas is so big, this makes the sticker easier to work with so it doesn’t get stuck to itself. Line up the top line on the painters tape, pressing it down onto the canvas. The transfer paper will stick to the canvas too, keeping everything in place.
- Fifth, remove the rest of the vinyl backing and smooth the remainder of the saying down on the canvas. Note: I had to remove the painters tape first because the 2nd line of the saying would have stuck to the tape instead of the canvas.
- Finally, rub the letters very firmly onto the canvas (I used a popsicle stick) and peel off the transfer paper, leaving only the vinyl letters on the canvas.

After you have your letter stickers on the canvas, do your best to rub down all the edges. This it kind of tough because the canvas is flexible and textured. But, don’t worry. To ensure the paint doesn’t bleed under the stickers, simply paint a thin coat of Mod Podge on the edges. I’ve done this on multiple canvases in my house, and it works very well. Just make sure it’s a thin coat. If you use too much, the paint will come up with the sticker when you peel it off.


Time for the Gender Reveal!!!
For the party, the canvas sat in the entryway on an easel that my parents made, to welcome the party guests. The saying wasn’t really visible unless you looked really closely. When we were ready, we moved the whole thing outside for the gender reveal.

For the reveal, I filled water guns with watered down acrylic paint (using a 50/50 ratio of paint to water). During the party planning process, my sister told me her nursery color choices for boy or girl. So, I filled each water gun with a different color paint from the nursery palette.
To fill the water guns, I used refillable plastic squeeze bottles (like you might use for condiments). Just shake up the paint and water in the bottle to mix it. The nozzle on the plastic squeeze bottle is the perfect size to put in the water gun filling hole. I did end up removing the plug in the water gun completely; it just worked better that way. They were easy enough to push back in once the guns were full of paint. I also pre-primed the squirt guns to make sure paint would come out “on 3.” It would have ruined the moment if they kept squeezing the triggers and nothing came out.

A special privilege of throwing this party for my sister is that I was the only person who knew the gender. So, I stood behind the canvas to capture everyone’s expression. I never had a gender reveal party, and it was so fun to see the surprise on everyone’s faces. Such a special moment to share with the whole family.

As you can see, the words didn’t magically appear as I originally wanted. But that’s okay. The surprise was in the paint color anyways. Everyone at the party thought it was so fun. And, we will be welcoming a sweet baby girl into the family this summer. I can’t wait to hold my niece!

How to Finish Your Canvas
Finishing the canvas is easy. After my bother-in-law very carefully got the paint colors just how he wanted (I love that), we took it into the garage. I used a hair drier to quickly dry the paint, which took just a few minutes. Then, I used a Silhouette spatula to peel up and remove all the letters (you could also use a utility knife to get under the edge, but be careful not to cut the canvas). Because of the Mod Podge, all the lines are very crisp. You can then seal the painting with a spray clear-coat sealer (found at the local home improvement store in the spray paint section or at the craft store).

I can’t wait to see this beautiful piece of art hanging above my niece’s crib. Such a special memory for the whole family.
Want More? Check out Bows or Arrows Gender Reveal Theme: Food, Decor & More and DIY Gender Reveal Party Decorations – Bows or Arrows – Printables and SVGs.
Save and Share these Ideas!! Click Here to Pin!!

This is so creative and exactly what I was wanting to do for my reveal next month. What kind of pre-cut lettering should I look for in the store to make this work? I dont have a way of making it like you did.
Hi Renee,
Look for pre-cut vinyl letters at the craft store. Amazon has some too, in a variety of sizes and fonts.
Hello. Do you think this would work without watering the color down? I am just curious 🙂
Hi Nichole. I watered down the paint because I thought it would be too thick in the squirt gun. But, I never tried it. If you try it, let me know how it goes.
Hi I did a test run and the paint leaked through the mod podge and through the vinyl letters. What type of letters you used for yours?
Hi Diana, I used Cricut removable matte vinyl and cut out the letters using my Silhouette Cameo.
So if I know someone with a Cricut just ask them to make a set of letters from removable matte vinyl ? We’re they white or clear?
Hi Kim, Yes a Cricut machine should work great for cutting out the letters too. I used a white vinyl.
Hi! Im getting ready to help my twin sister with her gender reveal (so excited!) and she loves this idea! I just have a question, did the letters peel off okay after the thin layer of modge podge? I guess I havent used modge podge enough to know how adhesive/sticky it is. Thanks!!! 🙂
Hi Amy, the modge podge just seals the edge so the paint doesn’t leak under the letters. I didn’t have any problem removing the letters after I got my tool under the edge of the letter. Hope that helps.
Do you have to remove the letters? Can you see what it says without removing them?
Hi Shayla!! It is pretty hard to see the saying if you don’t remove the vinyl letters. You just see the paint splatters. It might work if you used a different color other than white, but I’m not sure.
Hi so I am the removing letters part and I am having a hard time I used mod podge to seal the edges do you have any techniques I can use to remove the letter ? I used sticker letter cut outs from Walmart. Please help it looks cute but I’m having a hard time removing letter
Hi Pam, I’m glad your canvas turned out cute. To remove the letters, you’ll need something thin but not sharp. I used a silhouette spatula tool like this. If you don’t have something similar, I would try a pair of tweezers. Carefully break the seal at the edge of the letters. Work your way around the edge of the letters if they are really stuck on. Slide your tool or tweezers between the letter and canvas until it comes off easily. Hope this helps.
I was looking for clarification if that is ok? All that is needed is the canvas, vinyl, mod podge, water guns and paint?
I once the letters are on the canvas, i would mod podge the edges and then remove the letters carefully? Should i add modpodge in between?
I apologize if i am asking too many questions.
Hi Shaila, Thanks for the questions. You are correct. For this project, you only need a canvas, vinyl letter stickers, mod podge, water guns and paint. Once the letters are on the canvas, use a thin coat of mod podge on the edges of the letters. Leave the letters on the canvas until the canvas is painted with the squirt guns. Remove the letters after the paint has dried. Only use one thin coat of mod podge. If the mod podge is too thick, you won’t have crisp lines when you remove the letter stickers. Hope this helps.
Hi! I love this idea! Can you please tell me the height and width of your letters in inches please? It appears that there are 2 sizes. Thank you!
The larger letters are about 3.25″ tall (upper case) or 2.25″ tall (lower case) by 2.25″ wide. The smaller letters are about 2.25″ tall or 1.5″ tall by 1.5″ wide.
I just wanted to thank you for the detailed instructions in your post. We did our gender reveal yesterday and our 24×30 canvas turned out beautifully! I’m planning to add a clearcoat after baby is born. We are waiting so we can add a baby handprint and foot print using white paint. Thanks again!
Hi Robert, I’m so glad to hear your canvas turned out so well. Love the idea of adding the baby’s handprint and footprint!!
Hi!
Do you think it will work with regular acrylic paint and painting it on vs a water gun? This is a great idea, I love it!
Hi Britt, You can definitely apply acrylic paint with a brush instead of using the water guns. I’ve painted other canvases this way. If you’re using a brush, you don’t need to water down the paint. The water guns were just my solution to keep the paint color a secret for the surprise part of the reveal.
Can you use glossy vinyl?
Hi Rachel, Yes, glossy vinyl would work too.