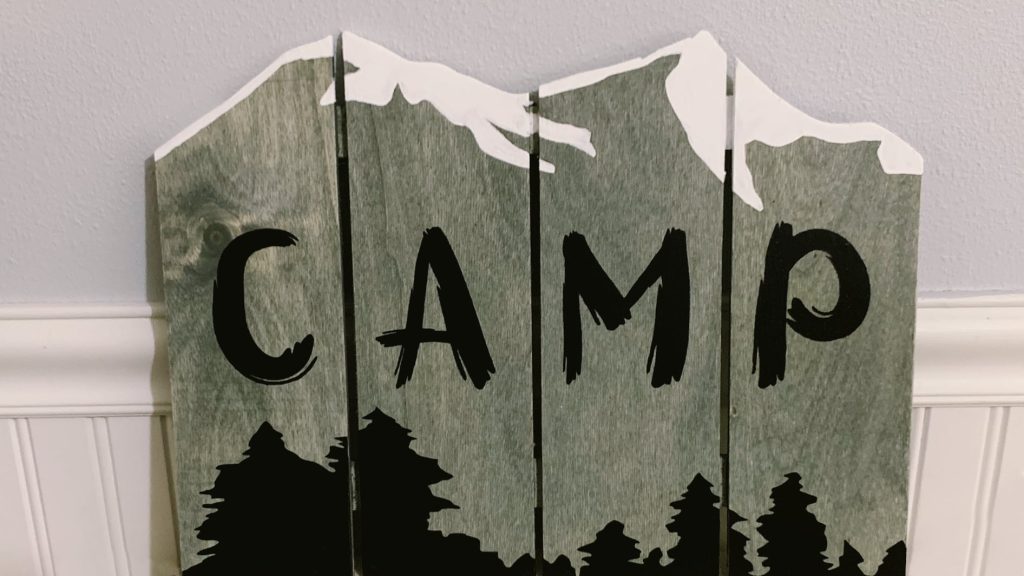
Create this easy DIY wood mountain wall art with wood stain, acrylic paint and heat transfer vinyl using the Silhouette Cameo. Makes a fun camping sign.

Today I want to share with you a fun and easy DIY project I made to hang in our RV. I really wanted to personalize our camper by adding some fun wall art. There are lots of ideas out there and free printables. Camping is all about being outdoors. As a family we love hiking through the woods. So, I was really drawn to all the signs with mountain silhouettes. Inspired by all the great ideas, I came up with this easy DIY wood mountain wall art. I had most of the supplies in my stash, so I only paid $5 for the wooden pallet sign at Walmart. The word Camp has a double meaning for our family (because it’s our last name and we like to camp), but you can personalize your sign with any saying you like.
Supplies Needed
- Unfinished Wood Sign or Scrap Wood
- Wood Stain
- White Acrylic Paint
- Card Stock
- Black Heat Transfer Vinyl
- Parchment Paper
Tools Needed
- Hand Saw or Jig Saw
- Wood Clamps
- Sand Paper or Sanding Sponge
- Paint Brushes
- Paper Towels
- Iron


Design You Art in Silhouette Studio
Start designing your sign in Silhouette Studio by measuring your piece of wood and making a rectangle the same size in your design space. My pallet sign had 4 separated rectangles, so that’s what I created first. Then, add a mountain silhouette and tree silhouette to your design space. Adjust the size of the mountains and trees to fit your sign. Finally, add your text using the Text Tool. If your wooden sign has gaps like this one, cut the tree silhouette with the Knife Tool in the gaps (the red lines in the first image). Cut the white mountain silhouette out of card stock using the Silhouette Cameo to create a stencil. Then, cut the tree silhouette pieces and letters out of black heat transfer vinyl. *Usually you have to reverse the image when using heat transfer vinyl, so make sure to read the package instructions.

Prepare and Cut the Wooden Sign
Now that you’ve designed your wall art and used your Silhouette to cut out all your pieces, it’s time to prep your wood. So, take the card stock mountain stencil you created and trace the mountain top onto the unfinished wood.

Next, clamp your wood to a work bench and cut along traced lines. I experimented with different hand saws. They all worked but it was time consuming. The jig saw is definitely the fastest and easiest method. Once you’ve cut out the mountain scape, sand the edges with sand paper or a sanding sponge.

Stain the Wood
After cutting and sanding the wood, it’s time to stain it. I used an outdoor blue-grey stain leftover from another project. Wipe the stain on with a brush or paper towel. Let the stain sit longer for a darker color. When you’re ready, wipe the stain off using paper towels. Make sure you wipe in the direction of the wood grain so that the wood grain shines through. Stain all sides of the wood and let it dry according to the package directions.

Paint the Snow Capped Mountains
Now that the stain has dried you can paint the mountain tops. Use the card stock stencil again and trace the mountain caps on the wood. (The pencil line is kind of hard to see, but it’s there.) Paint the mountains with while acrylic paint. I did a couple coats to make it really opaque. Be sure to paint the edges too and inside the gaps, if you have them.

Iron on the Heat Transfer Vinyl
I’ll be honest, this is the first time I’ve used heat transfer vinyl on wood. I’ve seen the idea floating around on Pinterest and decided to give it a try on this project. And, it works awesome. You can see the wood grain through the vinyl and it adds a fun texture to the project. Prepare your vinyl pieces by weeding out all the negative pieces. The image you’re using should remain on the clear liner.


Position the vinyl on the wood one piece at a time. The clear liner is a little sticky, so it will act as transfer tape. Iron directly on the clear liner to transfer the vinyl to the wood, following the package directions. DO NOT line up ALL the vinyl pieces at one time. If the vinyl overlaps a piece of liner it will transfer to the liner instead of the wood (I made this mistake on a t-shirt project I did). After transferring one piece of vinyl, cover it with parchment paper, this way it won’t get stuck to the iron while you’re ironing the next piece. Continue transferring all the vinyl pieces (and covering them with parchment) until your wall art is finished.

Now your DIY Mountain Wall Art is ready to hang. You can add picture frame hooks to the back for easy hanging. I used command strips so I wouldn’t have to put any nails in the wall of the RV. I really like the mixed-media look with the stain, acrylic paint, and vinyl. You could easily use all vinyl or all paint or use paint instead of stain. Have fun and get creative. I hope this project inspires you to make your own wood mountain wall art for your space.
Save and Share this Project!! Click Here to Pin!!